
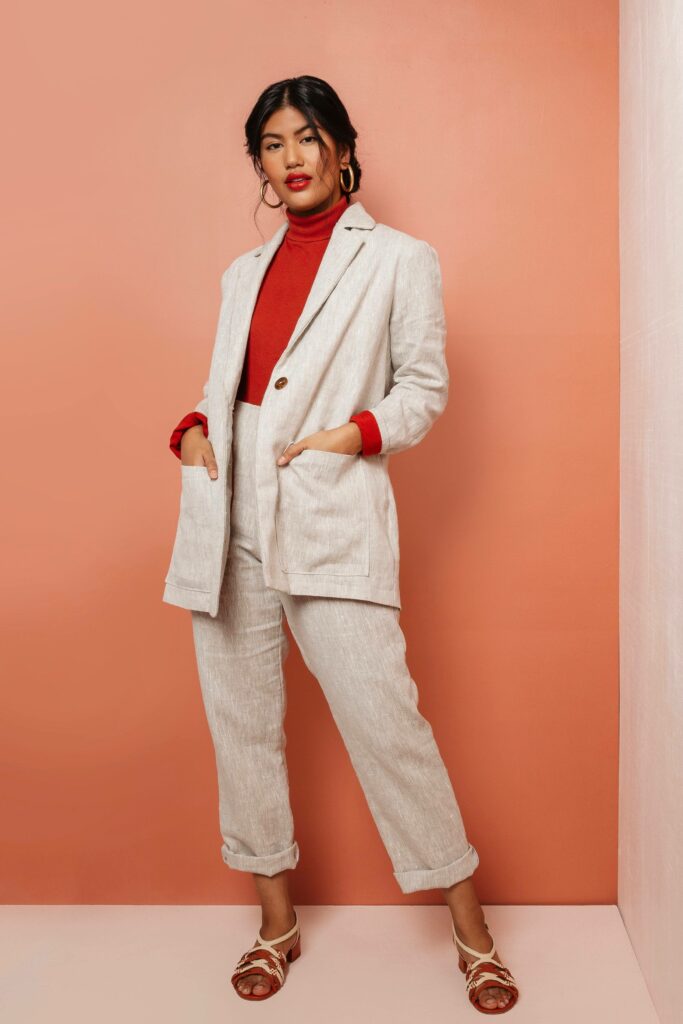
Hello my lovely sewing friends Kathryn here from @SerenitySews, I am so pleased to share with you my latest make which is the Heather Blazer from Friday Pattern Company.
A few weeks ago I went across to see Amanda who is the lovely owner of Sewcial Studio, we had been chatting on Inst and she had kindly offered me the chance to choose some fabric in return for a blog post. So of course who wouldn’t say yes to an offer like this.
For some time I had been thinking about making a jacket of some sort but one that was not too fitted and would be great for any time of day or night. So after looking through my extensive pattern collection I couldn’t really find what I wanted which was clean lines, no front fitting lines and a little bit oversized. So it was that I found the Heather Blazer fitting the bill.
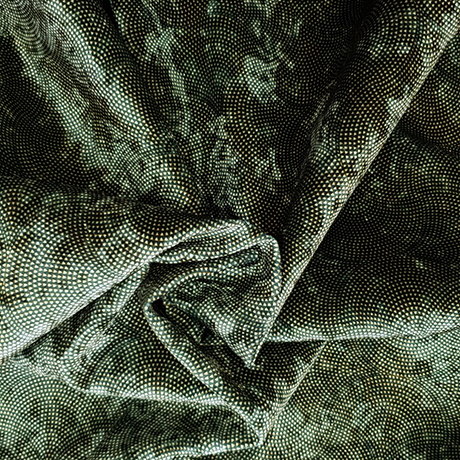
Now just had to choose the fabric. I visited Amanda’s lovely shop and first things first is a cup of coffee when you walk through the door. Honestly you could not get a warmer welcome anywhere. I had already seen the fabric on the website so I had an idea what I wanted. In ‘real life’ the fabric was even better, just perfect for a transitional piece, great for shopping or going out in the evening.
I went for this gorgeous velveteen Juniper Spirals
I did need a little bit of help from Amanda for the lining though, so much to choose from but as soon as Amanda put the bolt on the cutting table I knew.
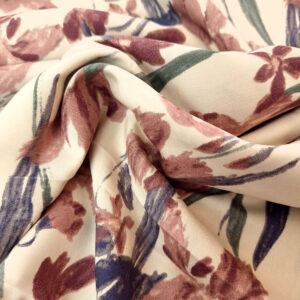
Although i understand this viscose is sold out now – you can guarantee there is always a delicious alternative, which amanda and Vicki will pull out for you
Perfection.
It was time to put scissors to fabric, and perhaps the longest part of this make was cutting out and preparation of the pieces. I used tailors’ tacks for marking all the pattern dots and notches, I find it is much better than using markers as I inevitably iron over them and have to do them again.
It is so important with any jacket making to use interfacing and tailoring techniques where required.
So I took time to use woven good quality interfacing

Amanda recommended the Vilene G700 and also supplies different interface packs which is just brilliant.
I used the ‘press and move’ technique not ironing movements. Wait until the interfacing has glued to the fabric before doing anything with it. It’s worth Noting that this jacket has different types of interfacing for the collar, under-collar and the facing for the revere.
Now whilst I followed the instructions, I did add some interfacing to the pocket edge to give it strength, also I did a band of interfacing around the cuff for the same reason.

I did also feel that the fabric was fairly sturdy and I wanted to make sure that the sleeves did not collapse when I had set them in. I decided to make my own sleeve head using some batting and stitching them in once I had set in the sleeves. I think you can see from the picture how well this supports the sleeve

I am a bit old fashioned in respect of tailoring so I got my trusty clapper out and used it to flatten out all of the seams.

The sewing was quick and simple really and to be honest the jacket itself can be put together in a few hours. The lining is easily explained and if you follow the instructions it goes together without too much difficulty. I also lined the pockets as I felt it would give me the finish I prefer, the pattern does not have you line it but that is the beauty of making your own clothes isn’t it?
The finished garment is everything I wanted it to be. I love it, I have worn it and I will wear it for years to come.

I want to say a huge thank you to Amanda at The Sewcial Studio for her kindness and the ability to influence dressmakers like me by providing such gorgeous fabrics and products. If you would like to see a detailed overview of this jacket and my thoughts have a look at my Youtube Channel SerenitySews.


